
Create a work order
Short answer
Add a work order to an approved project, fill in the timeline, resources and scope, then move it to Ready so it can be scheduled.
On this page
Work orders are the units of work inside a project: each one carries its own scope, timeline, resource requirements and status, and only work orders — never projects — get scheduled to crews. You create them from the project detail view using Add Work Order.
Administrators, Managers, Schedulers, Project Managers and Safety Managers can create work orders. Office Admins, Finance Coordinators, Site Leads and Site Workers cannot.
Before you start
The project must already be set up — customer linked, job-site location set, and at least one project contact (ideally one marked primary) — and in the right status:
- Advanced Status Mode — the project must be
approvedoractive. Work order creation is blocked onlead,estimating,pending_approval,complete,closedandjob_lostprojects. - Simple Status Mode — the project must be
active.
> Creating a work order automatically flips the parent project to active, whatever its current status. In Advanced Mode that bypasses the sales/estimating pipeline and fires lifecycle notifications out of order. Never use work order creation as a shortcut to activate a project — walk the project through its statuses from the project header actions menu instead.
Steps
- 1Confirm the project is set up and in the correct status (approved in Advanced Mode, active in Simple Mode).
- 2Open the project detail view.
- 3Click Add Work Order.
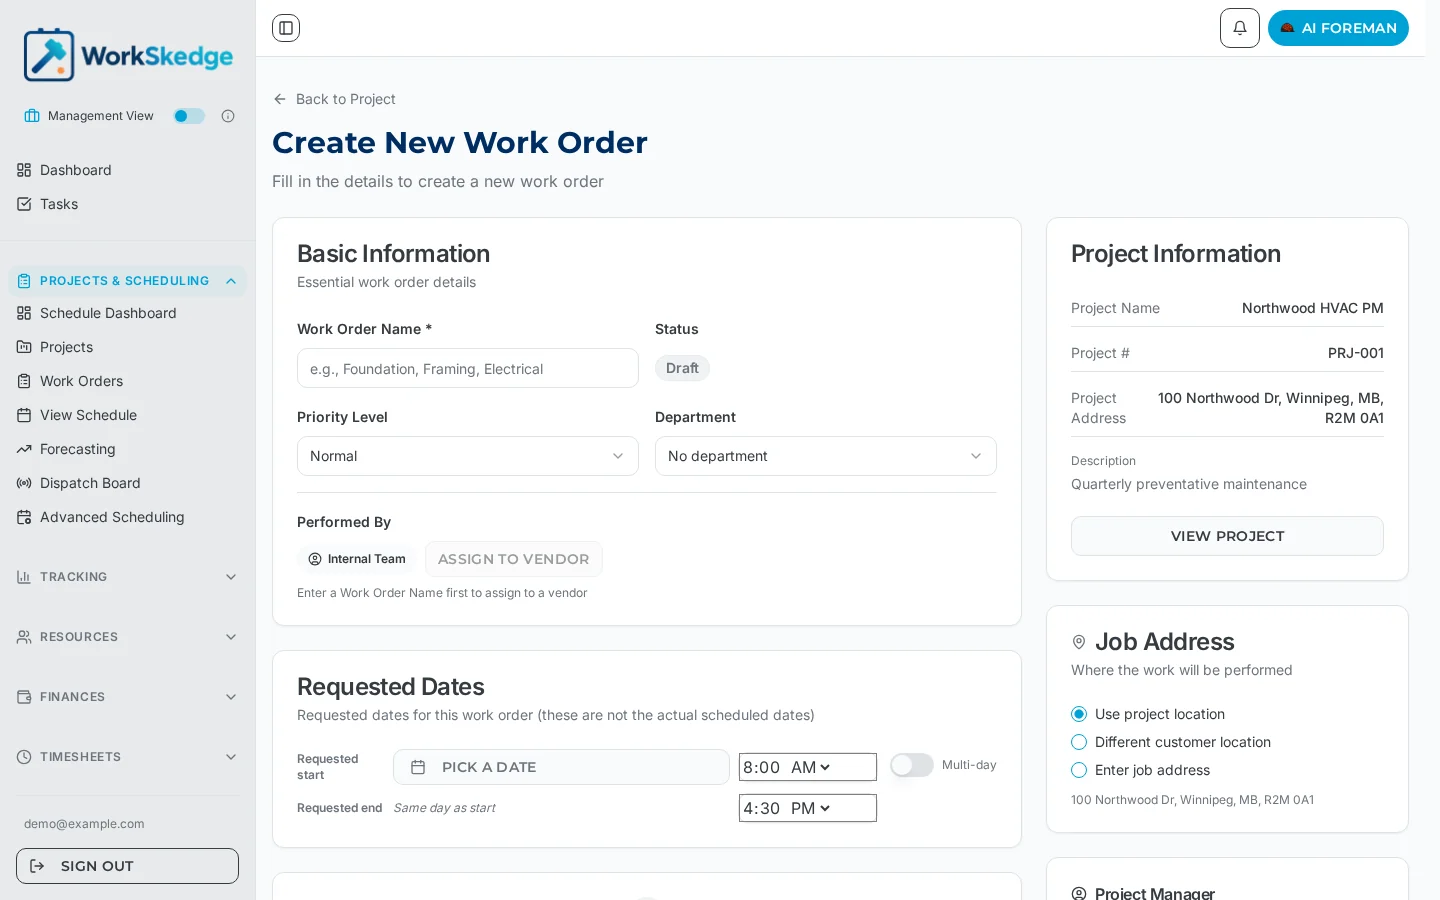
- 4Fill in basic info: name and number.
- 5Set the timeline — expected dates and times.
- 6Enter resource requirements, scope of work, and the materials and equipment needed.
- 7Set the status to Created and save the work order.
- 8When the details are settled, update the status to Ready so it can be scheduled.
What to fill in
Minimum requirements
- Phase name (the work order title)
- Parent project
- Expected start date
- Expected end date
Optional but recommended
- Work order number, for tracking
- Priority level
- Expected start and end times
- Performed by — Employee or Vendor (see assigning a vendor)
- Department — the team that owns the work
- People required, and days/hours required
- Scope of work, materials and equipment
- Travel required (
Decide automatically/Yes/No) and Nights away
Status flow
Save the work order in Created while you are still filling in scope. Move it to Ready when the details are settled — that is the status that enables scheduling. From there scheduling takes it to assigned, and it becomes active once work starts. The full list is in work order statuses and lifecycle.
Notes and limits
- Travel handling: an explicit Travel required = Yes/No always wins. Any night away makes it away work automatically. Left on Decide automatically, the company travel rules decide based on distance from home base and scheduled day length (defaults: auto-travel on, 300 km, 8 hours).
- Every edit after the first save is captured — see work order version history.
- Deleting a work order is restricted to Administrators and Managers.
Common errors
- "Add Work Order" is unavailable or blocked — the project is in a status that does not allow work orders (
lead,estimating,pending_approval,complete,closed,job_lostin Advanced Mode). Advance the project first. - The work order cannot be scheduled — its status is still Created. Set it to Ready.
- You can create but not schedule — Project Managers have create and edit permission but no scheduling permission. Ask an Administrator, Manager, Scheduler or Safety Manager.
- A closed project reopened unexpectedly — in Simple Mode, creating a work order on a
closedproject reverts it toactive. Re-open projects deliberately rather than through work order creation.
Planning multi-crew work? Compare the live dispatch board and advanced scheduling, or see how WorkSkedge handles scheduling and dispatch.
Also useful: add a scope of work checklist, progress and completion reports and find, filter and export work orders.
Frequently asked questions
Why can I not schedule my new work order?
Scheduling is enabled once the work order status is Ready. A work order still in Created is treated as a draft.
Where do I create a work order from?
From the project detail view, using the Add Work Order action. Work orders always belong to a project.
Does creating a work order change the project?
Yes — it flips the parent project to active. That is why the project should already be walked through its statuses before you add work orders.
Who can create a work order?
Administrators, Managers, Schedulers, Project Managers and Safety Managers can create and edit work orders. Office Admins, Finance Coordinators, Site Leads and Site Workers cannot. Note that Project Managers can create work orders but cannot schedule them — scheduling is limited to Administrators, Managers, Schedulers and Safety Managers.
What is the minimum information a work order needs?
A name (phase name), the parent project, an expected start date and an expected end date. Everything else — work order number, priority, times, Performed by, department, people required, days/hours required, travel required and nights away — is optional but recommended.
Was this article helpful?
Still stuck?
Send us the article name and what you expected to happen.
Last verified August 30, 2026